<body><script type="text/javascript"> function setAttributeOnload(object, attribute, val) { if(window.addEventListener) { window.addEventListener('load', function(){ object[attribute] = val; }, false); } else { window.attachEvent('onload', function(){ object[attribute] = val; }); } } </script> <div id="navbar-iframe-container"></div> <script type="text/javascript" src="https://apis.google.com/js/platform.js"></script> <script type="text/javascript"> gapi.load("gapi.iframes:gapi.iframes.style.bubble", function() { if (gapi.iframes && gapi.iframes.getContext) { gapi.iframes.getContext().openChild({ url: 'https://www.blogger.com/navbar.g?targetBlogID\x3d11442522\x26blogName\x3dCarter+Gardening+Journal\x26publishMode\x3dPUBLISH_MODE_BLOGSPOT\x26navbarType\x3dBLUE\x26layoutType\x3dCLASSIC\x26searchRoot\x3dhttps://cartergardening.blogspot.com/search\x26blogLocale\x3den\x26v\x3d2\x26homepageUrl\x3dhttp://cartergardening.blogspot.com/\x26vt\x3d8510019642210353744', where: document.getElementById("navbar-iframe-container"), id: "navbar-iframe", messageHandlersFilter: gapi.iframes.CROSS_ORIGIN_IFRAMES_FILTER, messageHandlers: { 'blogger-ping': function() {} } }); } }); </script>

Sunday, April 30, 2006

Planted Yaupon Holly

This afternoon we planted a Yaupon Holly (Ilex vomitoria) south of the deck under a large Mesquite tree. Only the female plants have the red berries that contrast to the dark green foliage during the season when most plants have lost all leaves. The evergreen large shrub or small tree is a nice accent or screening plant. It is native to central Texas but also does well in the Hill Country. It has a Hill Country cousin Ilex decidua (Possumhaw) which has berries in the winter on bare branches. It is grown in full sun or as a understory plant. Yaupons may reach 15 to 20 feet in height.

Monday, April 24, 2006

Planted Bachelor Button Seeds

This afternoon we planted some Bachelor Button Seeds in the bed west of the house. This area has traditionally had a ground cover of Saint Johns Wort. However; this year there are several areas where the Saint John's Wort had died, leaving bear ground. The Bachelor Button Seeds were heavily sown into the bare spots which receive full afternoon sun. The Bachelor Buttons should help fill in the area and give us some nice color while the Saint John's Wort has time to spread back into the area.

Planted Cucumber Seed

This afternoon we planted more Burpee’s Tasty Green Hybrid Cucumber Seeds. Only one of the two hills we planted earlier this month came up. Formerly known as Burpless Hybrid, this crisp delicious, mild-tasting cucumber won’t cause digestive problems. Fruits measure 10 inches in length and are excellent for salads or sliced. They are great with fresh dill for homemade pickles. Seedlings will emerge in 7 to 14 days depending on soil and weather conditions. They will be ready to start picking in about 62 days after sowing.

Sunday, April 23, 2006

Planted Gold Star Esperanza Seeds

Today we planted several dozen Gold Star Esperanza Seeds (Tecoma stans) we had harvested from our existing plants. Our Gold Star Esperanza, a Texas Superstar, is a spectacular heat-tolerant Texas native with striking masses of golden yellow, trumpet-shaped flowers. They are highly pest resistant. Wonderful in containers to accent entry and patio, also in mass plantings.

Saturday, April 22, 2006

Propagating Cape Plumbago

Today we started several Cape Plumbago (Plumbago auriculata) "cuttings". The Mother Plant is a tender perennial with profuse blue flowers which thrives in the hot Texas summer. Disease-, pest- and deer-resistant. Sometimes called "sky flower" because of the sky-blue color of its flowers. A native of South Africa, it loves the heat, doesn't mind our long, humid summers, and is reasonably drought tolerant. Plumbago is quite easy to propagate.

We took cuttings of about 7 inches long from the Mother Plant, cutting them just below a join. We then snipped off all the leaves except for one or two at the top end of the cutting (it is best to cut the leaves off rather than tear them off as this does not damage the stem). We used sharp pruning shears and kitchen scissors when taking the cuttings as it is best to get a nice clean cut rather than a ragged one so as to minimize the chances of fungal rot setting in. It is also best to take semi hardwood cuttings i.e. last years growth.

We put the cuttings in clean water to soak for about 15 minutes. While the cuttings were soaking in the water, we filled a plastic container with sharp river sand. We then dipped the cuttings in some hormone powder (e.g. Dip and Grow etc.) We used stick to make holes for the cuttings to be placed into in the river sand filled container (being careful to put them in the right way up as they will die if upside down). We then firmed the sand around each cutting with our fingers.

We watered the container and straightened any cuttings which may have become dislodged by the water before we placed the container in a shaded area. The cuttings must never be allowed to dry out so we will check that the sand is still moist every day. They should take about 4 to 5 weeks to form roots. We should notice new little leaves coming out. When they look as if they are ready we will check them to see if they have rooted.

Potted Rosemary Cutings

Today we potted our Rosemary Cuttings. To see if they had rooted properly we immersed the whole container in a bucket of water, stuck our fingers into the sand a bit away from the cutting and went down to the bottom of the container, scooped the cutting with its surrounding sand up into our hand and agitated a bit so that the sand came away in the water. On most of the cuttings we could see little roots had formed. We planted them in a mixture of half garden sand and half compost. We will keep them in morning only sun and moist until they are nicely established and a reasonable size then plant them out into our garden into a full sun spot.

Four O'Clocks Emerge

This morning we found a few of the Four O'Clock Seed we planted last Sunday have started to come up. This second planting of Four O'Clocks has germinated much faster than the first planting due to the warm soil temperatures.

Friday, April 21, 2006

Propagating Donkey's Tail

Today we started a new pot of Donkey's Tails (Sedum morganianum). The Donkey Tails or Burro's Tail is a trailing succulent plant, supposedly native to Mexico. However, many horticulturists claim they have never found a wild "Burro's Tail" in Mexico.

The succulent is easily grown from "cuttings." The plant creates long drooping tendrils several feet long. It has fat blue-green leaves growing on stems. This succulent will produce wonderful pink blooms in the spring.

Donkey's Tail makes an excellent indoor plant. It's particularly well-suited to growing in a hanging basket. We will grow ours where it can get direct sunlight which promotes the blue- green color in the leaves.

Even though it is a rugged plant and withstands extreme temperature changes, it must not be allowed to get too cold or close freezing. It likes an area with low humidity, and grows best when kept around 68 degrees F (20 degrees C).

Like all succulents, this plant is susceptible to over watering. During the active growing season, we will want to keep the top 1½ inch of the soil moist, being careful not to over water.

The "Donkey's Tail" is not a hungry plant, so we will only need to feed it occasionally with a low nitrogen fertilizer - maybe only once or twice a year.

It can be propagated very easily from stem or leaf cuttings. We started our leaf cuttings by simply removing the lower leaves from the Mother Plant and allowing the cut surface to dry for 24 hours before we planted them in a moistened cactus mix. Rooting will occur within a matter of a few days.

For a maximum effect, we planted several cuttings in our hanging basket because young plants are generally more attractive than older plants. When the Donkey's Tail gets to about 8 or 10-years-old, it begins to loose its distinctive blue- green color.

Zinnias Emerge

This morning we saw that a few of the Zinnia Seeds have germinated and they are starting to come up. The warm soil temperature has helped the germinate very quickly.

Thursday, April 20, 2006

Pink Oleanders Begin to Grow

Today we found the first new growth on the Pink Oleanders. Both of the plants that had been growing north of the house have new shoots coming up from their roots. So far there hasn't been any growth on their existing stems. The plant that had been growing in the pot has new growth on both it's existing stems and several new shoots coming from it's roots. All three plants should start to produce nice healthy plants within the next few weeks.

Wednesday, April 19, 2006

Poblano Pepper Emerge

Today the first of the Poblano Peppers began to emerge. They have taken 17 days to germinate due to the cooler temperatures we have been having recently. As the temperature continues to rise, they should begin to grow quickly.

Tuesday, April 18, 2006

Planted Zinnia Seeds

This afternoon we planted several packets of Zinnia Seeds in the area just west of the oleanders.

Sunday, April 16, 2006

Renovating the Wood Deck

This afternoon we added steps to Wood Deck. When we moved the deck from it's original location we had to cut off a three foot section in order to remove it from the Live Oak trees. Today we used this section to add steps to the deck. Once again Gary and Kathryn helped us with the project.

Before they arrived, we had removed two rows of 1-by-6 boards from the deck and had shortened five of the floor joists. We had also added a new 1-by-6 joist the section used to make the steps. When Gary arrived we were ready to attach the steps to the deck and to make minor adjustments in leveling the deck.

Kathryn and Mother went down to Gary and Kathryn's and made sandwiches for us all. We ate lunch at the work site.

The final stage of the renovation will be to repair the bench that is attached to the deck. We will then power wash the deck and apply wood preservative to it.

Planted Four O'Clock Seed

This afternoon we planted another three packets Four O'Clock Seed. We have expanded the area containing the Four O'Clocks to approximately double it's original size.

Planted Marguerite Daisy Seeds

This afternoon we planted our Marguerite Daisy Seeds. We will try to confirm that these are actually Marguerite Daisies. They came form plants that Don Morenas was growing in his garden. He picked some of the seeds from his plants and gave them to us. He wasn't sure what species they are. According to Don, they thrive in our Texas heat and are very prolific. They produce blossoms in various combinations of white, yellow and gold.

Monday, April 10, 2006

Purple Hyacinth Bean Seeds Emerge

Today the Purple Hyacinth Bean Seeds started to emerge. Yesterday it appeared that several of them were just under the surface of the soil ready to sprout, but they were not visible until this morning.

Sunday, April 09, 2006

Cucumber Seed Emerge

This afternoon we found that two of the Cucumber Seed have emerged. There are several seeds which appear to be just below the surface of the soil ready to emerge tomorrow.

Saturday, April 08, 2006

Building Natural Rock Planter - Part III

Today we completed the final section of the rock work for the Natural Rock Planter. After the masonry has had a few days to cure, we will fill the new section of the planter with soil. We will then be ready to add the plants.

We also completed the repairs to the rock patio on the south of the house. Roots from the Live Oaks had pushed several of the paving stones up and had cracked the mortar.

Friday, April 07, 2006

Moving Our Wood Deck

Today Gary and Kathryn Roberts helped us move the wood deck from our vacant lake lot to the property in front of the shop. The deck had been built with pressure treated lumber in the mid 80's by previous owners. It was designed to nestle in between the live oaks on the lot and was still in very good condition. There was a section cutout to allow one of the trees to grow through the deck.

Before we could move the deck we had to cut off three feet which included the section around the tree. After this section was removed, we used come-a-longs to pull the deck to the north to get it from between the trees. Once we had moved it out of the trees, we were able to use the trailer hitch on the pickup to remove it from the lot. We then pulled it down the road and onto the lot. We were then able to use come-a-longs and the pickup to position the deck among the live oaks on the lot. We then placed cinder blocks under the support beams and leveled the deck.

We will need to make a few minor repairs to the deck and the benches attached to it before we pressure wash it and apply wood preservative to help protect it.

After we finished moving the deck we took Gary and Kathryn to Corinia's Mexican Restaurant and had dinner with them. We were the last group of people to leave the restaurant. When we entered the parking lot we saw a small schnauzer puppy that was apparently lost. Kathryn picked him up and found his name and his owner's telephone number on his collar. We asked our waitress to see if she could call his owner to let them know we had found "Mr. Pepper". A few minutes later they drove to the parking lot to met us and to get their dog.

Thursday, April 06, 2006

Jalapeño Pepper Seeds Emerge

Today the first of the Jalapeño Pepper Seeds began to emerge. The seeds planted in the fifth flue tile are the only ones to have started to emerge thus far. This flue tile receives the most sunshine which may account for them being the first to emerge.

Wednesday, April 05, 2006

Four O'Clocks Emerge

Today we had one of the Four O'Clock seedlings emerge. We have decided to expand the area that will be planted with Four O'Clocks so we purchased two more packets of seeds today. We will plant the new seeds after the first group of seedlings are growing.

Tuesday, April 04, 2006

Purple Martins Arrive

Today while we were working on the Natural Rock Planter we heard the Martins chattering and chirping. They were flying high overhead and never came near the bird house. It's possible that they didn't like us working near the bird house. We will wait a few days before we complete the project so they can feel safe and secure. They have arrived much later this year than they did last year.

Building Natural Rock Planter - Part II

Today we completed Stage II of the Natural Rock Planter. We filled in the cracks and crevices that were in the natural rock formation, giving the allusion that there is only one large rock. This section required much less mortar than we had anticipated -- only one bag of mix. We also worked on a portion of a smaller retaining wall on the west side of the rock. This portion of the project will require an additional two or three rocks. Once they have been addded, we will back fill the area with soil and will be ready to add the plants.

Monday, April 03, 2006

Fertilized Saint Augustine Grass

Today we fertilized the Saint Augustine for the first time this year. It is unlikely that we will have another hard freeze this year so it is safe to fertilize the lawn. This year we will be using Scott's. According the the label, the next application is due in two months; however due to the number of live oaks and the shallow soil, we will probably need to fertilize the lawn again before then.

Bachelor Buttons Emerge

Today we spotted a few of the first Bachelor Buttons to start coming up. Within the next few days the remaining seeds should germinate.

Sunday, April 02, 2006

Planted Purple Hyacinth Bean Seeds

Today we planted some of our Purple Hyacinth Bean Seeds (Lablab purpureus). Last fall we harvested some of the seeds and had saved them for this year. We planted them in front of the first and fourth of the trellis in the garden area north of the house. This will be the first year that we have tried growing them in this area. The "Happy Returns" Daylilies have been transplanted directly behind them next to the property line.

The beans and pods of the hyacinth bean are a popular offering on tables across the Indian subcontintent, however they contain toxic compounds removed only by cooking, and are best used as an ornamental feature.

General Maintenance
Pinch young plants to encourage branching. Deadhead spent blooms to encourage flowering, but let some mature to produce the beautiful seedpods. Provide string, trellis, or stakes on which the vine can climb. Water frequently. For a heavy bean crop, fertilize young plants biweekly with a balanced soluble fertilizer until flowering begins, following label directions.Leaf spot may occur. To discourage fungal disease, avoid wetting foliage when watering, and remove and dispose of fallen leaves. If necessary, spray weekly with a mixture of 4 teaspoons baking soda and 1 tablespoon horticultural-oil spray per gallon of water.

Planted Jalapeño Pepper Seeds

Today we planted some of the Jalapeño Pepper Seeds. We planted them in the first, third and fifth flue tiles along the property line next the garden area north of the house. the second and fourth flue tiles have Poblano peppers.

Jalapeño peppers are named after the town of Jalapa in the Mexican state of Veracruz. They are bright medium to dark green, tapering to a rounded end and measure about 2 to 3 inches long and 1 to 1½ inches in diameter. They are thick fleshed and have a green vegetable flavor. They are probably the best known and most widely eaten hot chile in the United States and the first chile to be taken to space, in 1982. Jalapeños can be added to almost anything that you want to spice up: salsas, stews, breads, sauces, dips etc. they can be diced up and used as a topping for snack foods. They are also good pickled (en escabeche) or roast them and stuff them with cheese, fish or meat to be served as cocktail snack.

Planted Poblano Pepper Seed

Today we planted some of the Poblano Pepper Seeds. We planted them in the second and fourth flue tiles along the property line next to the garden area north of the house. The first, third and fifth flue tiles have Jalapeño peppers.

Poblano peppers are one of the most popular fresh green chilies used in Mexico. They are dark green, with a purple-black tinge, tapering down from the shoulders to a point. They measure about 4 to 5 inches ling and 2½ to 3 inches in diameter. They are thick fleshed; and vary in strength between medium to hot. They are mistakenly referred to as a pasilla in California, even though the pasilla is a different type of chile altogether. The green poblano is always used cooked or roasted and never eaten raw. Roasting gives the poblano a fuller, smoky more earthy flavor. Poblanos that are fiery should be seeded and deveined. This chile is favored for making chiles rellenos or any other stuffed chili dish because of its size and the thickness of the flesh. Also good as rajas, or made into sauces, especially moles and papiáns.

Planted Cucumber Seed

Today we planted some Burpee's Tasty Green (Burpless) Hybrid Cucumber seeds. We planted the seeds in front of the two middle trellis in the garden north of the house, between the trellis with the Purple Hyacinth Beans. They should germinate in 8 to 10 days. This variety is also called Burpless Hybrid and is for people who love to eat cucumbers but don't want digestion upset. They should product slim fruits that are mild and crisp growing to 12 inches. Harvest in 62 days.

First Hummingbird Sighted

Today we saw the first humming bird for this year. Last Friday we thought we heard one flying around the Japanese Maple, but didn't see it. Today we heard one flying and then saw it feeding on the azaleas. We put out one of the hummingbird feeders this afternoon.
Saturday, April 01, 2006

Propagating Lemon Grass


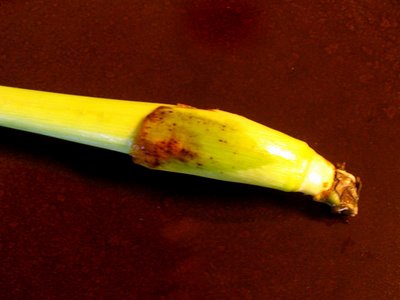
Today we purchased a stalk of Lemon Grass (Cymbopogon ciatrus) at Filipino Food Store in Abilene for fifty cents. The owner of the store found a stalk of Lemon Grass for us that had started to grow a few roots. He suggested that we keep it in a glass of water until the roots have grown to a couple of inches long before we plant it outside.

Lemon Grass is a tall tropical grass. The fresh stalks and leaves have a clean lemon like odor because they contain an essential oil, which is also present in lemon peel.

Spice Description
Lemon grass is a long thick grass with leaves at the top and a solid portion several inches long at the root end. The lower portion is sliced or pounded and used in cooking. As a spice, fresh lemon grass is preferred for its vibrant flavor, but is also sold in dried form. The dried spice is available in several forms: chopped in slices, cut and sifted, powdered, or as an oil can be extracted from the plant.

Preparation and Storage
If using fresh lemon grass, use only the lower bulbous portion of the stem. It can be pounded and used whole or cut in slices. When using the ground powder (sereh) use one teaspoon as an equal to one stalk of fresh. It is advisable to soak dried sliced lemon grass for two hours before using.
When wrapped in a paper bag, lemon grass stems can last 2 to 3 weeks in the refrigerator. The stems can also be frozen for several months. Always wrap and store separately, as lemon grass will impart its flavor to other foods.

Culinary Uses
Lemon grass features in Indonesian, Malaysian, Sri Lankan and Indian cooking and is widely used in savory dishes and meat, poultry, seafood and vegetable curries. It harmonizes well with coconut milk, especially with chicken or seafood, and there are countless Thai and Sri Lankan recipes exploiting this combination. The stems are also used in teas or used in pickles and in flavoring marinades.

Attributed Medicinal Properties
The grass is considered a diuretic, tonic and stimulant. It promotes good digestion, and a preparation of lemon grass with pepper has been used for relief of menstrual troubles and nausea. It induces perspiration, to cool the body and reduce a fever. It is well known a mild insect repellent (citronella) and the essential oil is used in perfumery.

Plant Description and Cultivation
Lemon grass is a perennial tufted grass with long, sharp-edged blades. It grows in dense clumps in tropical or subtropical climates. Propagation is by dividing the root clump. The plants last three to four years and are harvested every three to five months. It is grown throughout Southeast Asia, Southern India, Sri Lanka, Central Africa, Brazil, Guatemala, the US and the West Indies.